I'm sorry to announce I'm closing my business, Jay Bee Designs. This is my last post. Since my husbands passing 3 months ago I've purchased a home in Oregon. Time to bond with my family. I look forward to hugs and the cutest great grand babies ever. I'm on a new adventure.
Thanks to all that have supported and followed me. Your truly appreciated.
Joan
Aug 3, 2014


May 8, 2014
New Design Makes Front Cover
My Spring Folly, wall quilt, pattern has been published in The Quilt Pattern Magazine May issue. This is a great, economical, downloadable, magazine. Check it out at www.thequiltpatternmagazine.com


Spring Folly
Thanks for visiting.
Joan
Apr 29, 2014
Quick Placemat
I've always wanted to make a Dresden Plate quilt. After making a few Dresden Plate units I decided it was more than I wanted to tackle. Now what do I do with the few units i made? They've been in a drawer for quite a while. I finally came up with a solution. Applique them onto a store bought placemat. The picture below shows my version of the finished product. I'm thinking of making holiday placemats this way. A pumpkin would be fun or? Use your imagination.
 I think I'll make some napkins to match. If you decide to do this be sure and share the results with us. I will not share your email or add you to a list.
Happy quilting,
Joan
Happy quilting,
Joan
Apr 2, 2014
My Latest Adventure
I've been published in the April issue of The Quilt Pattern Magazine. Check it out at www.quiltpatternmagazine.com. I titled it Tony Tugboat, after my son. I sure had fun with this whimsical pattern.

Thanks for visiting and allowing me to share and brag. :-)
Joan
Mar 28, 2014
Half-Square Triangle Sampler Part 7
This is the last of the instructions for this sampler. Putting it all together. For the black sashing and first border cut 11 strips 2-1/2" by the width of fabric. From these strips: Note: These cutting dimensions are based on our measurements. You might measure your blocks and rows to adjust for your measurements if they're different.
Cut (8) 2-1/2" x 12-1/2" strips for sashing and (5) 2-1/2" x 40-1/2" strips for border. Sew the remaining 3 strips together, end to end. From this pieced strip cut (2) 2-1/2" x 52-1/2" strips for the long side borders. Sew three blocks and two 2-1/2" x 12-1/2" black strips together as shown below. This creates one row. Repeat to complete the remaining three rows.
 Row 1
Row 1
 First border:
Sew a 2-1/2" x 40-1/2" black strip to the top and bottom of the quilt top. Sew a 2-1/2" x 52-1/2" black strip to the long sides of the quilt top.
Pieced border:
Cut a 2-1/2" strip of each fabric used in your quilt. Sew the strips together lengthwise to make a strip set. Crosscut the strip set into segments 2-1/2" wide.

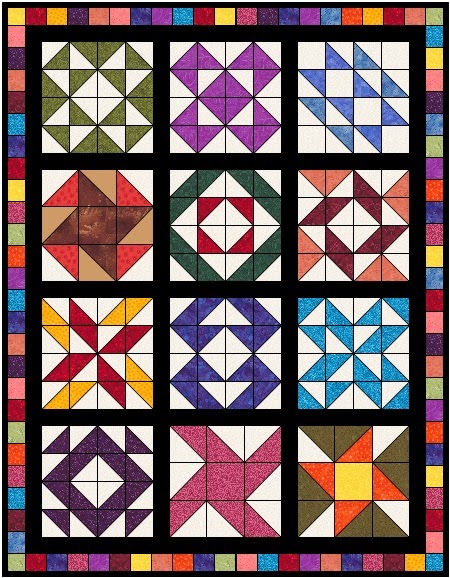
Cut (8) 2-1/2" x 12-1/2" strips for sashing and (5) 2-1/2" x 40-1/2" strips for border. Sew the remaining 3 strips together, end to end. From this pieced strip cut (2) 2-1/2" x 52-1/2" strips for the long side borders. Sew three blocks and two 2-1/2" x 12-1/2" black strips together as shown below. This creates one row. Repeat to complete the remaining three rows.
Row 1
Referring to the photo below sew rows 1 and 2 together using a 2-1/2" x 40-1/2" black strip. Repeat for rows 3 and 4. Sew the 4 rows together with a 2-1/2" x 40-1/2" black strip in between.
Sew a 2-1/2" x 40-1/2" black strip to the top and bottom of the quilt top. Sew a 2-1/2" x 52-1/2" black strip to the long sides of the quilt top.
Pieced border:
Cut a 2-1/2" strip of each fabric used in your quilt. Sew the strips together lengthwise to make a strip set. Crosscut the strip set into segments 2-1/2" wide.
Sew the segments together end to end to make the length needed for the top and bottom borders. Sew these borders to the quilt. Repeat to make the length needed for the long side borders.
Finishing:
After quilting our sampler we chose to bind it in black. Cut 6 strips 2-1/2" by width of fabric for the binding. Sew these six strips together end to end. Attach binding using your favorite method.
If you have any comments, questions or to share photos of your finished project feel free to contact me at jaybeehive@yahoo.com
Thank you for joining me on this sampler adventure.
Enjoy,
Joan
Mar 21, 2014
Half-Square Triangle Sampler Part 6
Here are the last two blocks of the sampler pattern. Blocks #9 and #10. Each block uses sixteen 3-1/2" x 3-1/2" Half-Square triangle units. Instructions for the Half-Square triangle units are in my February 14th post.


Block #9 Block #10
Next week I will share the sashing and border instructions with you.
There are a number of extra blocks that can be made with Half-Square triangles. Below is a bonus block to play with.
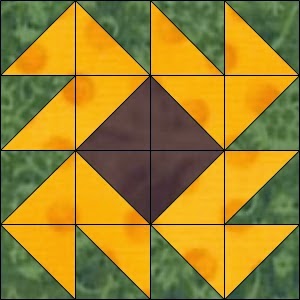
Bonus block
Here's some homework. :-) Why not make some extra units, lay them out on a table, and create a new block by twisting and turning them? Might be fun.
Till next week happy quilting.
Joan
Block #9 Block #10
Next week I will share the sashing and border instructions with you.
There are a number of extra blocks that can be made with Half-Square triangles. Below is a bonus block to play with.
Bonus block
Here's some homework. :-) Why not make some extra units, lay them out on a table, and create a new block by twisting and turning them? Might be fun.
Till next week happy quilting.
Joan
Mar 14, 2014
Half-Square Triangle Sampler Part 5
Today brings us to blocks #7 and #8. Each block uses sixteen 3-1/2" x 3-1/2" Half-Square triangle units. Instructions for the Half-Square triangle units are in my February 14th post. As shown below block #7 uses three colors and #8 two colors.


Block #7 Block #8
Here's another way to use a block. I chose block #8 to make a baby quilt. Four blocks and a border create this quilt that measures approximately 32" x 32". The border in my sample measures 4" wide, finished. By using novelty print fabric or colors to match your decor this makes a great table topper.
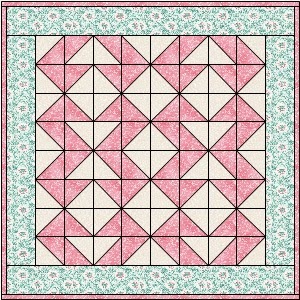 The following is a challenge for you. The quilt below shows a different version of block #8. See if you can figure out how I created the blocks.

Block #7 Block #8
Here's another way to use a block. I chose block #8 to make a baby quilt. Four blocks and a border create this quilt that measures approximately 32" x 32". The border in my sample measures 4" wide, finished. By using novelty print fabric or colors to match your decor this makes a great table topper.
I'm hoping you share some of your ideas and pictures of your samples with me. Please note, I do not add you to a list or pester you with email. I may respond once to acknowledge your message. I can be contacted at jaybeehive@yahoo.com
Thanks again for joining me.
Stay tuned for blocks #9 and #10 next week.
Joan
Mar 7, 2014
Half-Square Triangle Sampler Part 4
In this post I'll be sharing Block #5 and #6. Using the instructions for the Half-Square triangle units in part 1, posted on February 13, 2014, make sixteen 3-1/2" x 3-1/2" units to create each block as shown below. Note color placement. Each of these blocks uses three colors.


Block #5 Block #6
Want to complete a quick project. Make two of your favorite block. One for the sampler and the extra block for a pillow.
Join me on March 14th for block #7 and #8. I look forward to your visit and sharing with you.
Be sure and contact me with any questions at jaybeehive@yahoo.com
Joan
Block #5 Block #6
Want to complete a quick project. Make two of your favorite block. One for the sampler and the extra block for a pillow.
Join me on March 14th for block #7 and #8. I look forward to your visit and sharing with you.
Be sure and contact me with any questions at jaybeehive@yahoo.com
Joan
Feb 28, 2014
Half-Square Triangle Sampler Part 3

Cut two squares, one light and one dark, 5-1/2" x 5-1/2" each. Using diagram below as a guide draw a diagonal line corner to corner on the back of the light square. Layer and pin the marked square on top of the dark square right sides together. Sew 1/4" from each side of the drawn line. Press flat. Cut on the drawn line. Press open toward the dark fabric. You now have two Half-Square Triangles. Square up these units to measure 4-1/2" x 4-1/2" square. For each block cut a center square 4-1/2" x 4-1/2".


Block #4 Block #11

Block #12

Placemat sample
Visit me on March 7th for block #5 and #6.
Happy quilting,
Joan
Feb 21, 2014
Half-Square Triangle Sampler Part 2
I've decided to share two blocks a week as opposed to one as stated in the first sampler blog. Below is a picture of the completed sampler.
 Following the instructions for Half-Square triangles, in my February 13th post, make 16 units to create each block numbers 2 and 3 as shown below.
Be creative. How about using holiday fabrics? I'll share more ideas on how to use the blocks from this sampler in my next post on February 28th.
Be sure to contact me with any questions or comments at jaybeehive@yahoo.com
Thanks for visiting,
Joan
 |
| Block #2 Don't want to make 12 blocks? |
 |
| Block #3
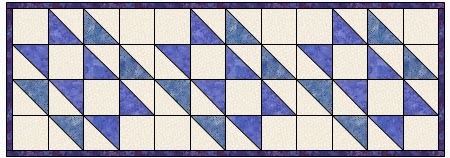
Choose 1 block and make a runner.
 |
Be sure to contact me with any questions or comments at jaybeehive@yahoo.com
Thanks for visiting,
Joan
Feb 13, 2014
Half-Square Triangle Sampler Part 1
The following is my interpretation of a sampler quilt using one unit for all twelve blocks, the Half-Square Triangle. This is a fun and quick project. Another benefit is it's a way to use up your scraps. There are twelve blocks measuring 12-1/2" x 12-1/2" unfinished. I'll be sharing a block a week with you. OK so you don't want to wait the twelve weeks to finish your quilt. There are those of you who can look at the blocks and finish them. By all means do it. The point is to have fun and work at your pace.
 The following instructions are for the Half-Square Triangle units used in the blocks. Cut two squares, one light and one dark, 4-1/2" x 4-1/2" each. Using diagrams below as a guide draw a diagonal line corner to corner on the back of the light square. Layer and pin the marked square on top of the dark square right sides together. Sew a 1/4" from each side of the drawn line. Press flat. Cut on the drawn line. Press open toward the dark fabric. You now have two Half-Square Triangles. Square up these units to measure 3-1/2" x 3-1/2" square. Note: There are 3 blocks that use different dimensions. I will share the instructions with you when the blocks are due for piecing.
Block number 1 uses sixteen (16) Half-Square Triangle units. Turn and sew the units together to create the block as shown.
 I look forward to sharing this quilting adventure with you. Look for block number 2 next week.
Any questions feel free to contact me at jaybeehive@yahoo.com.
Joan
Any questions feel free to contact me at jaybeehive@yahoo.com.
Joan
Dec 14, 2013
Holiday Happenings
I'm taking a short break from quilting and decided to do a little cross stitching. Being bitten by the holiday bug I made the two snowmen shown below.


I love snowmen. I started collecting them then thought better of it. I can't collect snowmen and fabric too. Not enough room in our house.
Have a very merry Christmas and a happy new year.
Joan
Nov 14, 2013
What To Do With Those Cut-Away Triangles
To find out what cut-away triangles are, and fun ways to use them, click on the link below.
https://drive.google.com/file/d/0ByFb4zA9u-RiSHZ5WkhReGtURk0/edit?usp=sharing
Enjoy,
Joan
https://drive.google.com/file/d/0ByFb4zA9u-RiSHZ5WkhReGtURk0/edit?usp=sharing
Enjoy,
Joan
Sep 27, 2013
Tooting My Horn. New Quilt Patterns.
These are my new patterns now available on my web site. www.quiltersfun.com


Pinwheel Puzzle is a table runner measuring 12" x 34-1/4". I've created a new fun and quick technique to make the units for this pattern. Can you find the pinwheels? It looks complicated but is simple. Choice of fabric gives the illusion of a contemporary, modern look. What about holiday fabrics? I might try that.

Southwestern Trilogy is a small wall hanging measuring 7-1/4" x 18-3/4". Perfect for that little side wall or an RV. This pattern goes together quickly and is a great way to use up some of your stash.
Enough bragging for today.
Thanks for visiting.
Joan
Sep 23, 2013
Quick Christmas Ornaments

I found these at a thrift store. I was so excited as they're made with thin cotton batting. Differant shapes can be found in coloring books, Google Christmas shapes, or use cookie cutters. They measure as follows.
Heart: 3" wide by 2-3/4" high
Mitt: 1-3/4" wide by 2-3/4" high
Bird: 3-3/4" by 2" high
Stocking: 2-1/4" wide by 2-1/2" high
How to make them? Well first find the shape you want. Trace the shape onto a piece of template plastic and cut out on the traced line. Trace the image on a piece of batting. Repeat as you'll need two of the same shape. Cut the shapes on the traced line. Layer the two shapes together. With colored thread of choice blanket stitch around the outside of the image leaving an opening for stuffing. Stuff with cotton balls or fiber fill. It only takes a little stuffing as you don't want these too fat. Continue the blanket stitch to close the opening and finish the edge. Add a hanging loop and your done.
If you have any questions feel free to contact me at jaybeehive@yahoo.com or leave a comment.
Happy quilting!
Joan
Sep 2, 2013
More News to Share
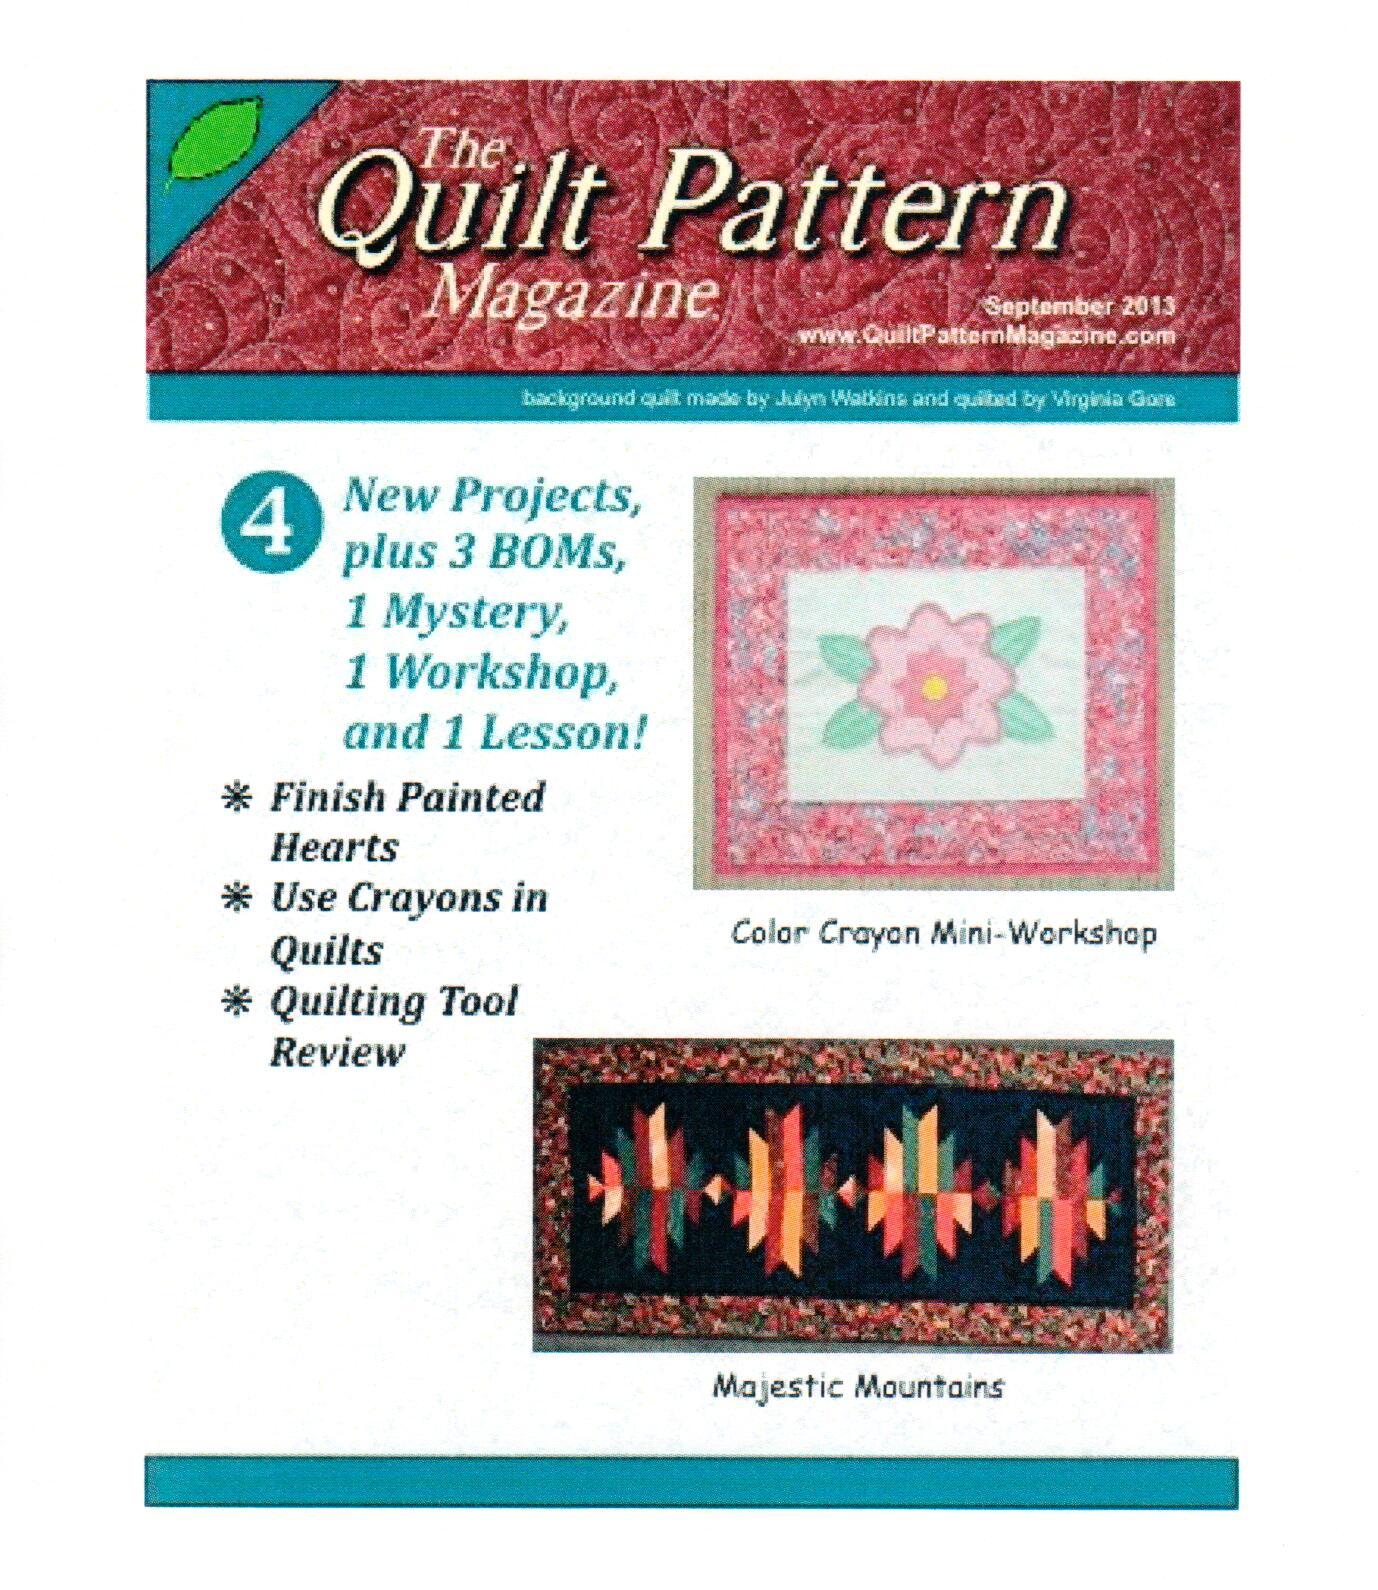
My Color Crayon Mini Workshop has been published in the September 2013 issue of The Quilt Pattern Magazine. I even made the front cover. My directions tell how to make the cutest little wall hanging. A great technique using color crayons to create a work of art to use in any quilt. Fun too. For information on this magazine visit www.thequiltpatternmagazine.com

Happy quilting!
Joan
Aug 7, 2013
Sharing a Demo on Valdani Thread
The only thread I've tried from Valdani was for machine piecing. I really liked it. After watching this video I'm tempted to try the pearl cotton for wool applique. If you decide to try their threads please share your comments with us. To view the video click on the following link
Please note: I am not affiliated with Valdani or paid to promote their inventory.
Thanks for visiting.
Joan
Jul 18, 2013
Sharing the News
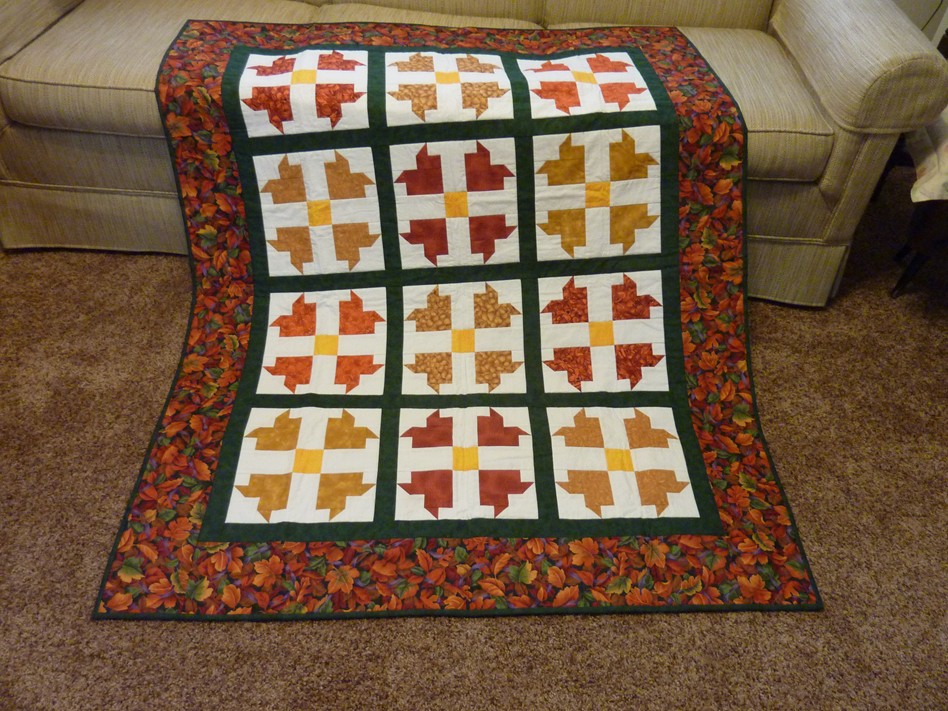
I'm doing a happy dance and had to share with my friends and followers. My design, Potpourri, has been published in the Autumn 2013 Quilter's World magazine.

 As usual I'm keeping busy. I'm now working on a kid's whimsical wall hanging called "Tony Tugboat". All it needs, to be completed, is that special fabric for the border. A challenge.

Till next time happy quilting.
Joan
Jul 1, 2013
Here's a Great Pattern and It's Free!

http://quiltwoman.com/pdf/TerracottaDreams.pdf
Happy stitching,
Joan
Jun 26, 2013
What To Do With Orphan Blocks?
If you're like me you have a stash of orphan blocks. You know, the one you wanted to try before you made the pattern or sampling different fabrics first. Whatever the reason they're stacking up. I asked some of my quilting buddies how they used their blocks. Here are some of the ideas they shared with me.
Mini wall hangings, mug rugs (coasters), pot holders, pillows, hot pads, table runners, applique to a sweatshirt, and placemats. One lady made placemats and donated them to Meals on Wheels. What a neat treat. If you have any ideas on how to use orphan blocks please let me know and I'll share them with others. Feel free to send pictures of your samples to jaybeehive@yahoo.com . Would love to see them.
Thanks for visiting,
Joan
Mini wall hangings, mug rugs (coasters), pot holders, pillows, hot pads, table runners, applique to a sweatshirt, and placemats. One lady made placemats and donated them to Meals on Wheels. What a neat treat. If you have any ideas on how to use orphan blocks please let me know and I'll share them with others. Feel free to send pictures of your samples to jaybeehive@yahoo.com . Would love to see them.
Thanks for visiting,
Joan
Subscribe to:
Posts (Atom)