Labels

Showing posts with label Free Pattern. Show all posts

Mar 28, 2014

Half-Square Triangle Sampler Part 7

This is the last of the instructions for this sampler. Putting it all together. For the black sashing and first border cut 11 strips 2-1/2" by the width of fabric. From these strips: Note: These cutting dimensions are based on our measurements. You might measure your blocks and rows to adjust for your measurements if they're different.
Cut (8) 2-1/2" x 12-1/2" strips for sashing and (5) 2-1/2" x 40-1/2" strips for border. Sew the remaining 3 strips together, end to end. From this pieced strip cut (2) 2-1/2" x 52-1/2" strips for the long side borders. Sew three blocks and two 2-1/2" x 12-1/2" black strips together as shown below. This creates one row. Repeat to complete the remaining three rows.

Row 1

Referring to the photo below sew rows 1 and 2 together using a 2-1/2" x 40-1/2" black strip. Repeat for rows 3 and 4. Sew the 4 rows together with a 2-1/2" x 40-1/2" black strip in between.
First border:
Sew a 2-1/2" x 40-1/2" black strip to the top and bottom of the quilt top. Sew a 2-1/2" x 52-1/2" black strip to the long sides of the quilt top.
Pieced border:
Cut a 2-1/2" strip of each fabric used in your quilt. Sew the strips together lengthwise to make a strip set. Crosscut the strip set into segments 2-1/2" wide.


Sew the segments together end to end to make the length needed for the top and bottom borders. Sew these borders to the quilt. Repeat to make the length needed for the long side borders. 
Finishing:
After quilting our sampler we chose to bind it in black. Cut 6 strips 2-1/2" by width of fabric for the binding. Sew these six strips together end to end. Attach binding using your favorite method.


If you have any comments, questions or to share photos of your finished project feel free to contact me at jaybeehive@yahoo.com 
Thank you for joining me on this sampler adventure. 
Enjoy,
Joan


Mar 21, 2014

Half-Square Triangle Sampler Part 6

Here are the last two blocks of the sampler pattern. Blocks #9 and #10. Each block uses sixteen 3-1/2" x 3-1/2" Half-Square triangle units. Instructions for the Half-Square triangle units are in my February 14th post.


                  Block #9                                                                                                   Block #10

Next week I will share the sashing and border instructions with you.
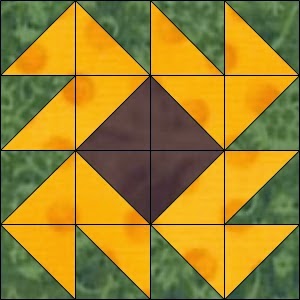
There are a number of extra blocks that can be made with Half-Square triangles. Below is a bonus block to play with.

                                                                           Bonus block

Here's some homework. :-) Why not make some extra units, lay them out on a table, and create a new block by twisting and turning them? Might be fun.
Till next week happy quilting.
Joan

Mar 14, 2014

Half-Square Triangle Sampler Part 5

Today brings us to blocks #7 and #8. Each block uses sixteen 3-1/2" x 3-1/2" Half-Square triangle units. Instructions for the Half-Square triangle units are in my February 14th post. As shown below block #7 uses three colors and #8 two colors.


                 Block #7                                                                                                    Block #8
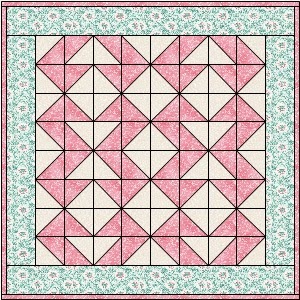
Here's another way to use a block. I chose block #8 to make a baby quilt. Four blocks and a border create this quilt that measures approximately 32" x 32". The border in my sample measures 4" wide, finished. By using novelty print fabric or colors to match your decor this makes a great table topper.
 The following is a challenge for you. The quilt below shows a different version of block #8. See if you can figure out how I created the blocks.

I'm hoping you share some of your ideas and pictures of your samples with me. Please note, I do not add you to a list or pester you with email. I may respond once to acknowledge your message. I can be contacted at jaybeehive@yahoo.com
Thanks again for joining me.
Stay tuned for blocks #9 and #10 next week.
Joan


Mar 7, 2014

Half-Square Triangle Sampler Part 4

In this post I'll be sharing Block #5 and #6. Using the instructions for the Half-Square triangle units in part 1, posted on February 13, 2014, make sixteen 3-1/2" x 3-1/2" units to create each block as shown below. Note color placement. Each of these blocks uses three colors.


                Block #5                                                                                           Block #6
Want to complete a quick project. Make two of your favorite block. One for the sampler and the extra block for a pillow.
Join me on March 14th for block #7 and #8. I look forward to your visit and sharing with you.
Be sure and contact me with any questions at jaybeehive@yahoo.com
Joan

Feb 28, 2014

Half-Square Triangle Sampler Part 3

Welcome back. I'm changing the rules a bit. This sampler has three blocks with different cutting dimensions. To keep things simple I'm sharing the instructions here for Block #4, #11, and #12.
Cut two squares, one light and one dark, 5-1/2" x 5-1/2" each. Using diagram below as a guide draw a diagonal line corner to corner on the back of the light square. Layer and pin the marked square on top of the dark square right sides together. Sew  1/4" from each side of the drawn line. Press flat. Cut on the drawn line. Press open toward the dark fabric. You now have two Half-Square Triangles. Square up these units to measure 4-1/2" x 4-1/2" square.  For each block cut a center square 4-1/2" x 4-1/2".
These three blocks use eight (8) Half-Square Triangle units. Note color placement. Two of these blocks use three colors. Turn and sew the units together to create the block as shown.


                 Block #4                                                                                                   Block #11

Block #12

Need a quick gift? Choose your favorite block and make a placemat. My sample was made by cutting two pieces 3-1/2" x 12-1/2" for the side borders.

                                                                    Placemat sample

Visit me on March 7th for block #5 and #6.
Happy quilting,
Joan


Feb 21, 2014

Half-Square Triangle Sampler Part 2

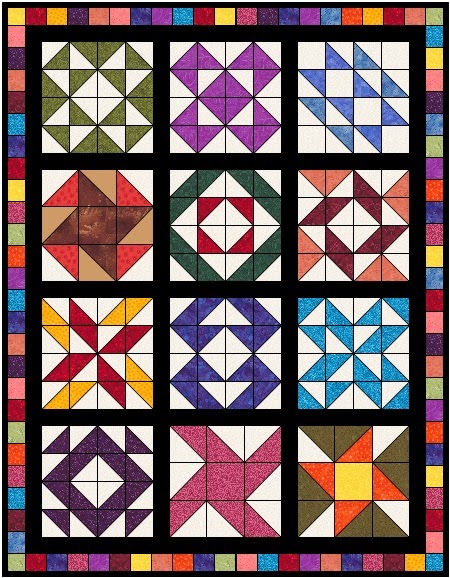
I've decided to share two blocks a week as opposed to one as stated in the first sampler blog. Below is a picture of the completed sampler.
Following the instructions for Half-Square triangles, in my February 13th post, make 16 units to create each block numbers 2 and 3 as shown below.
                      Block #2
 Don't want to make 12 blocks? 
Block #3
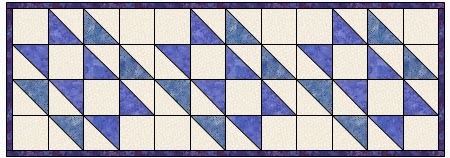
  Choose 1 block and make a runner.


Be creative. How about using holiday fabrics? I'll share more ideas on how to use the blocks from this sampler in my next post on February 28th.
Be sure to contact me with any questions or comments at jaybeehive@yahoo.com
Thanks for visiting,
Joan
                     

Feb 13, 2014

Half-Square Triangle Sampler Part 1

The following is my interpretation of a sampler quilt using one unit for all twelve blocks, the Half-Square Triangle. This is a fun and quick project. Another benefit is it's a way to use up your scraps. There are twelve blocks measuring 12-1/2" x 12-1/2" unfinished. I'll be sharing a block a week with you. OK so you don't want to wait the twelve weeks to finish your quilt. There are those of you who can look at the blocks and finish them. By all means do it. The point is to have fun and work at your pace.
The following instructions are for the Half-Square Triangle units used in the blocks. Cut two squares, one light and one dark, 4-1/2" x 4-1/2" each. Using diagrams below as a guide draw a diagonal line corner to corner on the back of the light square. Layer and pin the marked square on top of the dark square right sides together. Sew a 1/4" from each side of the drawn line. Press flat. Cut on the drawn line. Press open toward the dark fabric. You now have two Half-Square Triangles. Square up these units to measure 3-1/2" x 3-1/2" square. Note: There are 3 blocks that use different dimensions. I will share the instructions with you when the blocks are due for piecing. 
Block number 1 uses sixteen (16) Half-Square Triangle units. Turn and sew the units together to create the block as shown.
I look forward to sharing this quilting adventure with you. Look for block number 2 next week.
Any questions feel free to contact me at jaybeehive@yahoo.com.
Joan


Nov 14, 2013

What To Do With Those Cut-Away Triangles

To find out what cut-away triangles are, and fun ways to use them, click on the link below.

https://drive.google.com/file/d/0ByFb4zA9u-RiSHZ5WkhReGtURk0/edit?usp=sharing

Enjoy,
Joan


Sep 23, 2013

Quick Christmas Ornaments


I found these at a thrift store. I was so excited as they're made with thin cotton batting. Differant shapes can be found in coloring books, Google Christmas shapes, or use cookie cutters. They measure as follows.
Heart: 3" wide by 2-3/4" high
Mitt: 1-3/4" wide by 2-3/4" high
Bird: 3-3/4" by 2" high
Stocking: 2-1/4" wide by 2-1/2" high
How to make them? Well first find the shape you want. Trace the shape onto a piece of template plastic and cut out on the traced line. Trace the image on a piece of batting. Repeat as you'll need two of the same shape. Cut the shapes on the traced line. Layer the two shapes together. With colored thread of choice blanket stitch around the outside of the image leaving an opening for stuffing. Stuff with cotton balls or fiber fill. It only takes a little stuffing as you don't want these too fat. Continue the blanket stitch to close the opening and finish the edge. Add a hanging loop and your done.
If you have any questions feel free to contact me at jaybeehive@yahoo.com or leave a comment.
Happy quilting!
Joan

Jul 1, 2013

Here's a Great Pattern and It's Free!


Thanks to QuiltWoman and the designers Linda Hahn & Merry May for this pattern. This would also look great with holiday fabrics.
http://quiltwoman.com/pdf/TerracottaDreams.pdf
Happy stitching,
Joan

Jun 17, 2013

Oh So Easy Table Runner, Free Pattern


This runner would look great using a novelty print in place of the purple. What about a holiday print? The options are endless with this quick and easy pattern. Just click on the link below for your free pattern.
https://docs.google.com/file/d/0ByFb4zA9u-RiNC04eDRuOFFubUE/edit?usp=sharing
If you decide to make this pattern be sure and share it with us. Would love to see the results.
Happy quilting,
Joan

May 19, 2013

Free Quilt Pattern. Scrap Buster Country Placemat


Here's a great way to use up your stash of scraps. Be warned, this can be addictive. If applique is not for you why not fussy cut a novelty print for the center. It's fun to chose colors to fit your decor. Since this is a scrappy placemat they don't have to match when making sets. Would love to see a picture of your finished placemat. You can share it with me at jaybeehive@yahoo.com  I promise not to share your info.
Click here for your free pattern.
https://docs.google.com/file/d/0ByFb4zA9u-RiaTc4MExCOUwxNTA/edit?usp=sharing

Happy quilting,
Joan

Mar 11, 2013

Free Pattern "Midnight Garden"

Here's a great way to use that novelty print fabric you've been saving. I had fun playing with motifs and fussy cutting fabric. Some options are: A baby quilt using pastels, a patio quilt or table topper, or how about a vintage quilt. I'm sure you have ideas that will work for you.

To access the pattern click on the link below.


For more of my patterns visit my web site www.quiltersfun.com

Enjoy and thanks for stopping by.
Joan

Dec 13, 2012

Quilted Christmas Ornament Coaster Pattern Free

Tis the season and as usual I'm running late. The following is my gift to you. A fun and quick project. Wouldn't it be neat to give as a hostess gift? You can tie a stack of four together with a ribbon and include a hot cocoa mix. Just click on the link and print. https://docs.google.com/open?id=0ByFb4zA9u-RicXp1UzBYdUZMMEE

Happy holidays,
Joan

Nov 16, 2012

Free Baby Quilt Pattern

Baby Blocks
36-1/2" x 36-1/2"
Three colors create this simple pattern designed by me. Just click on the link below to access the pattern.
Thanks to Vanessa Wilson from Crafty Gemini my pattern is downloadable.

If you have any questions don't hesitate to contact me at jaybeehive@yahoo.com
Happy quilting.
Joan

Feb 24, 2012

New, Free, Butterfly Quilt Pattern

Need a small, quick, wall hanging? Well this is the block for you. This is a 12" x 12" finished block. Visit my web site at http://www.quiltersfun.com/ for a free pattern on how to make this block and finish it as a pillow. No need to register or sign in just click Free Patterns on the left side of the home page.
Enjoy!
    Joan


Jan 8, 2012

Quick Pinwheel Quilt Pattern Free

Need a quick gift? This is it. Not only quick but fun. Warning: This could be addictive. Lets get started.
To make a pinwheel: Using 1/4" seam allowance sew a light and a dark 2" strip together lengthwise. Press seam toward the dark fabric. Cut the pieced strip into 3-1/2" sections. See Diagram below.
Using the diagram below as a guide sew four cut sections together to make a
6-1/2" x 6-1/2" pinwheel block. Press seams to one side.

That's all there is to it. Below shows a sample of how to use these blocks. The border strips were cut 3-1/2".
The finished size is 18-1/2" x 42-1/2".

Some ideas:
Use scraps to make each pinwheel a different color.
Holiday fabrics are great for special occasions. 
Make a square table topper or candle mat.
A wall hanging or quilt is easy. Just sew as many blocks together as needed.
Enjoy! Wishing you the best of the new year.
Joan


Oct 18, 2011

Free Pattern "Pumpkin Treat"

Here's a simple, quick, wall hanging in time for the holidays. Finished size: 9-1/2" wide x 10-1/2" long.
Material Needed
One 3" x 6-1/2" piece for pumpkin center.
Two 2" x 6-1/2" pieces for pumpkin sides.
One 1" x 2" green piece for stem.
One green 4" square for leaf.
Binding-Two strips 2-1/2" by width of fabric.
Backing- One 13" x 14" piece.
Thin cotton batting- One 12-1/2" x 13-1/2" piece.
Background fabric- One strip 2-3/4" by width of fabric. Cut this strip into (1) 2-3/4" x 9-1/2" piece for top border, (2) 2-1/4" x 6-1/2" pieces for side borders, and (1) 2-1/4" x 9-1/2" for bottom border, and four 2" squares. NOTE: The top border is wider than the remaining three borders. This is not a typographical error.
Sewing Instructions: Use 1/4" seam allowance for all piecing unless otherwise instructed. Sew the long sides of the pumpkin center and sides together as shown in picture. Press seams to one side.
Draw a diagonal line on the back of the four 2" background squares. Using the picture below as a guide place a marked square on each corner of the pieced pumpkin. Stitch on the drawn line of each square. Fold each square back over the stitched line and press creating corner triangles as shown in the picture.

Border and finishing: Sew the side borders to the pumpkin. Press seams to the border. Sew the top and bottom border on remembering the 2-3/4" wide border goes on top. Press seams to the border. On the 1" x 2" stem cut a 60 degree angle on one short end. This doesn't have to be exact. Place the stem as shown on the top of the pumpkin with the bottom end below the top border seam by 1/4". Using the raw edge applique method sew 1/16" to 1/8" around the inside edge of the stem.

Click on the leaf diagram below to highlight it. Right click on picture for options and click on  print picture. The image will have to be enlarged to the specified measurements. Trace the leaf image onto a piece of template plastic. Cut out on the traced line. Place the template on the wrong side of the 4" green square. Trace around the template. Cut out on the traced line. Using the finished picture above as a guide pin the leaf in place. Sew 1/16" to 1/8" around the inside edge of the leaf. 
Layer the batting between the pieced top and backing. Pin or baste layers together. Quilt as desired. The sample was machine quilted in the ditch in the center pumpkin seams, around the pumpkin, and around the stem and leaf. Using your favorite method add a hanging sleeve and the binding.
If you have any questions or find an error in this pattern feel free to contact me at jaybeehive@yahoo.com 
I promise I wont keep your email address or contact you unless you ask me to.  
Enjoy the holidays!
Joan

Jun 24, 2011

Free Pattern "Scrappy Framed Stars"

Another idea on how to use up your stash of scraps. A simple Ohio Star framed in different colors.

Block measures 8" x 8" finished.
For each block cut:
Corner squares "A" (4) 2-1/2" squares of different colors.
Flying Geese unit "B" (4) 2-1/2" x 4-1/2" rectangles of different colors.
From white fabric cut:
Star points "C" (8) 2-1/2" squares.
Center of star "D" (1) 4-1/2" square.

PUTTING IT TOGETHER
Flying Geese units. Draw a diagonal line on the back of the (8) "C" squares. Place a marked "C" square on one end of a "B" rectangle, right sides together. Sew on the line.
Fold the bottom left corner of the "C" square back over the seam toward the top right corner and press. Cut the center layer of fabric in the corner off leaving a 1/4" seam allowance.

With right sides facing place a marked "C" square on the opposite side of the rectangle. Sew on the line. Fold back over the seam, press and cut center layer away as previously instructed.
The finished unit should look like the diagram below.

Using the remaining "B" and "C" pieces make three more Flying Geese units.
Rows 1 and 2: Sew an "A" square on opposite sides of a Flying Geese unit. Press seams toward the "A" squares. Repeat one more time.

Center row: Sew a Flying Geese unit to opposite sides of the "D" square. Press seams toward the "D" square.
Using the diagram below as a guide sew the rows together. Press seams to one side.

Below are finished projects using the Scrappy Framed Star blocks.

For the table runner I recommend using 12" square blocks and maybe adding a border.
For a finished 12" square block cut:
Corner squares "A" (4) 3-1/2" squares of different colors.
Flying Geese unit "B" (4) 3-1/2" x 6-1/2" rectangles of different colors.
From white fabric cut:
Star points "C" (8) 3-1/2" squares.
Center of star "D" (1) 6-1/2" square.

                                                     
I wonder what these blocks would look like on the diagonal?
Happy stitching and once again thanks for visiting.
Joan